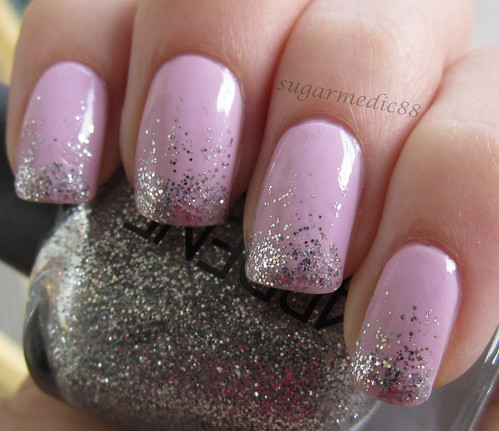
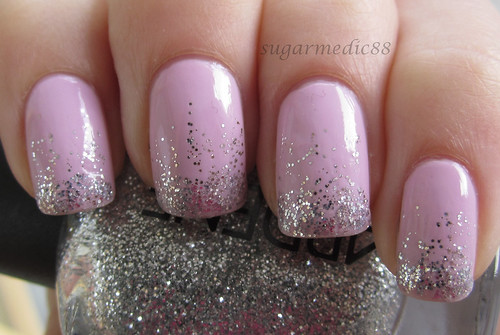
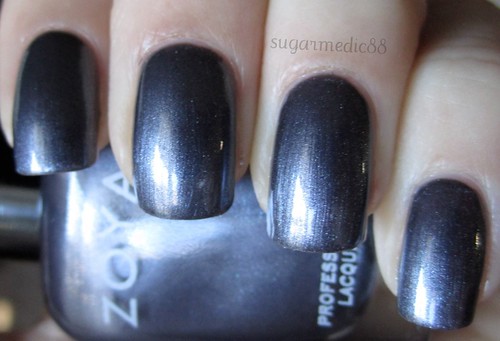
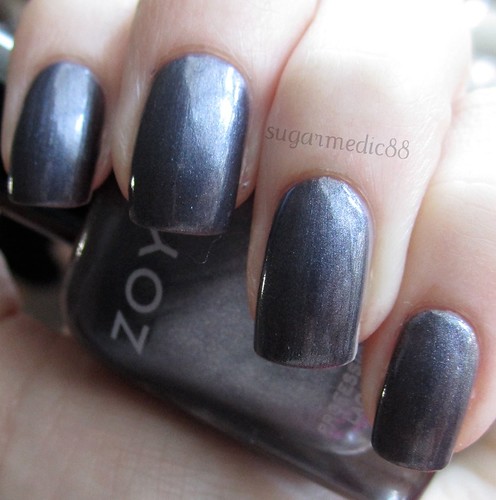
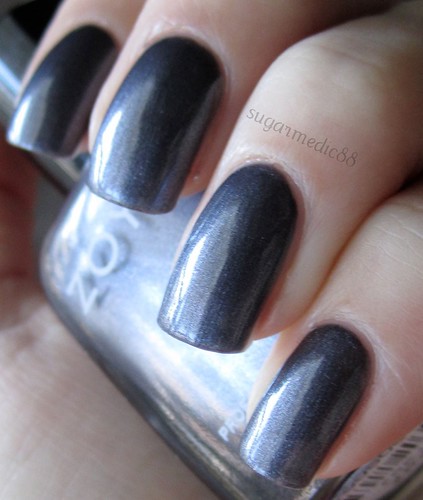
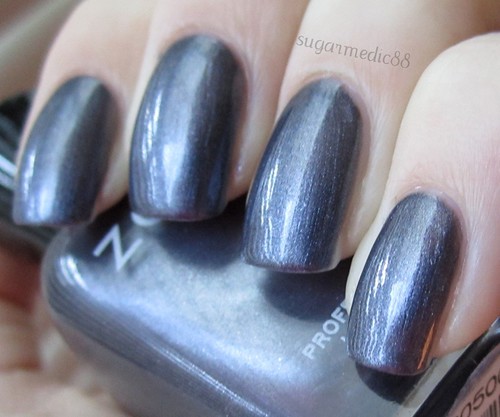
Pages

Sunday, February 26, 2012

Zoya Freja

Did you know it's been almost TEN months since I posted a Zoya polish!? Well, prior to posting Rica. Not that I have a ton of them, but I haven't even posted half of what I have! (In my defense, I've posted 4... I have 9). So after reorganizing my Helmer this week, I decided it's definitely time I posted another Zoya! So I picked Freja.


Zoya Freja

Zoya Freja

Zoya Freja

Zoya Freja

Zoya Freja


2 coats Zoya Freja
1 coat Poshe

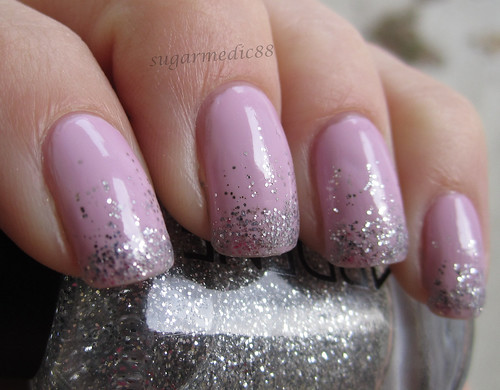
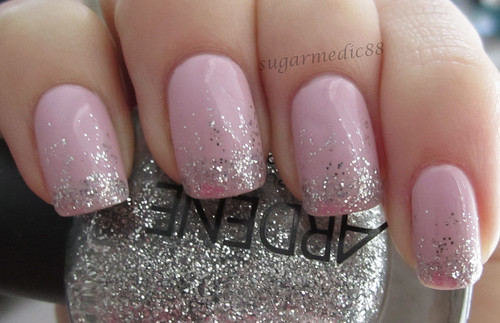
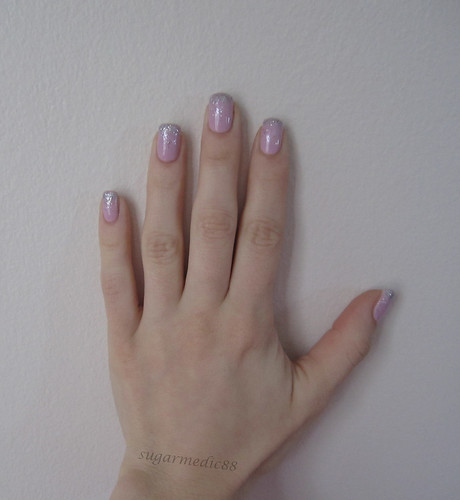
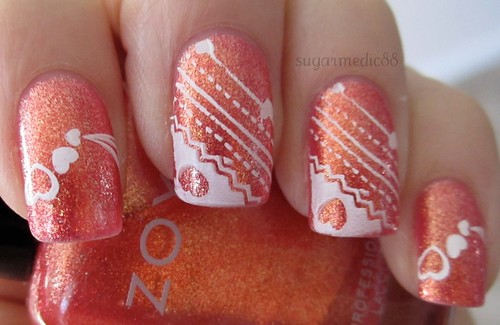
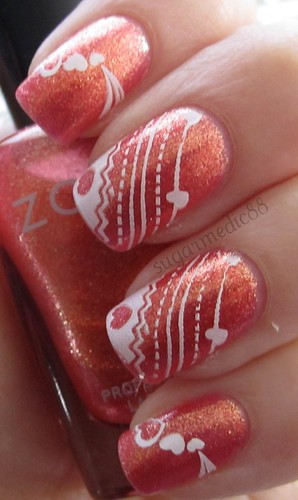
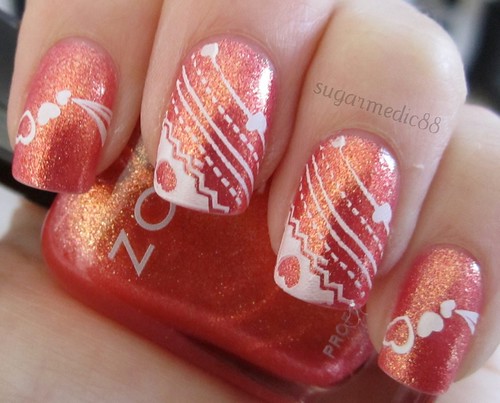
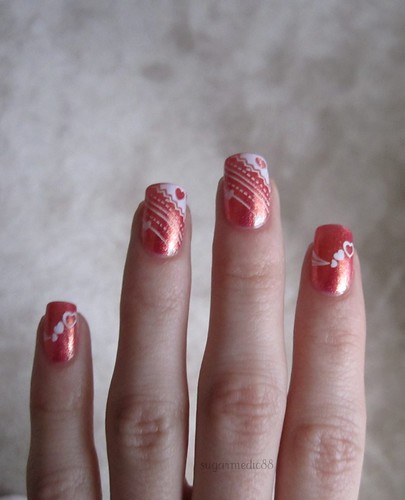
Freja is a beautiful charcoal grey metallic-y polish with a faint shimmer and almost a lilac/blue undertone (which is why I have so many photos). It's not metallic in a chrome sort of sense, but more of a metallic shimmer. I'm going with that. Metallic shimmer. I feel like if this weren't grey, it'd just be a shimmer and not necessarily metallic. Does that make sense?

Holy gosh I would put this polish on every day... if it would change colors =P. This polish was actually FUN to apply. The combination of Zoya's brush and the formula of this polish made it just amazing and easy. If you're a beginner with polishes or you need something easy to apply to help practice your technique, I HIGHLY suggest this polish. Like I said, not only have I not posted a Zoya polish in close to a year, I also haven't worn one. I don't remember if they all apply is great or if Freja is a stand out.

Here's why it was awesome. The brush is a perfect width for my nails. It is not perfectly round, but not flat. It's obvious which was the brush should be turned to allow the bristles to fan out properly. The tip of the brush is straight, not rounded or curved. The bristles were perfectly soft and flexible so they spread evenly but were stiff enough that you still had complete control of how the bristles fanned out depending on the pressure you used. The density of the bristles was also perfect in that it hid brush strokes very well, and each individual bristle was the right size so this also helped.

The formula could have gone two ways. Opaque in 1 thicker coat or opaque in 2 thinner coats. I chose the latter. This really was an amazingly friendly polish to work with. Formula alone should make you pick this up!!

Wednesday, February 22, 2012

OPI Fly

I've been LOVING teal for a few months now. I fell in love with it when I moved and was trying to decide on a color scheme for my living room. I settled on greys, whites, and blacks, but I still needed color. Teal. So now I'm obsessed with teal. I never really had a favorite color besides when I was a child and I liked pink and my sister liked purple. But once I started shopping for home stuff, teal came in!! I realized I didn't have any true teal polishes. I have and love Orly Bailamos, but it wasn't exactly the teal I had in mind. Unfortunately, I don't know that this is either, but it's so close that it's the best I have right now!! While I'm not a huge OPI fan, I do love Nicki Minaj and I love teal, so this polish was def a win for me!!


OPI (Nicki Minaj) Fly Swatch

OPI (Nicki Minaj) Fly Swatch

OPI (Nicki Minaj) Fly Swatch


Fly is a pretty straight forward teal creme. In some lights the green stands out more than the photos show. It's a beautiful, simple color.

The formula was fine. Opaque in 2 coats with no problems. Per usual, I hate OPIs brush, but paired with a good formula, and it was totally fine.

Sunday, February 19, 2012

Orly Prelude to a Kiss

As soon as I saw the press releases for this polish, my interest spiked. As soon as I saw swatches, I knew I HAD to have it!! I've been searching for a similar color for quite some time. The right peachy, vintage-y, not too neon, not too pink, not too orange, not too dark color. I still want a polish a little darker, but I'm loving this for now. I saw Essie A Crewed Interest swatches and fell in love. Then I saw The PolishAholic's comparison to Prelude to a Kiss and obviously I'll pick Orly over Essie! Essie's pastel/light creme formulas frustrate me to no end!!
I went to my Sally's that doesn't usually carry new collections. I didn't see it out, so I started to walk out the door when the SA asked what I had been looking for. I told her I was looking for the new spring Orly collection but didn't see it. Then I re-asked to confirm that they don't sell new collections? She told me they're starting to get new collections in and she's sure she saw that collection in the back! I honestly couldn't remember the name of the polish so I looked it up on my phone quickly. She went to the back, grabbed that polish for me, and here we are!! Yay for AWESOME Sally's SAs! Not my usual experience with Sally's, but they're getting FAR better!! I'm so excited!

Side note, not gonna lie... I hate the name of this polish. I swear Orly really sucks sometimes at naming polishes. It's almost as annoying as Fancy Fuchsia.


Orly Prelude to a Kiss

Orly Prelude to a Kiss

Orly Prelude to a  Kiss

Orly Prelude to a  Kiss


2 coats Orly Prelude to a Kiss
1 coat Poshe
*photos taken on 3rd/4th day of wear (put on Thursday evening, photos taken Sunday morning).

This color is beautiful. As I said above, it is a light peach creme that does not lean too pink or too orange. It's not fleshy, I like it on my yellow/olive toned skin, don't know how it'd look on very pinky toned skin. It's a brighter pastel without being a neon pastel. It has a vintage feel that I am SO excited to do some pretty nail art to.

The formula was not fantastic, but it's what I expected for a pastel peach. The polish is thick and pigmented but very manageable. Completely opaque in two coats. Did have a little trouble with cuticle drag on the second coat, but the polish self levels pretty well, so it essentially fixed itself. This is one of those polishes where you need to let the brush rest in the bottle for a second before you go from nail to nail. But it wasn't bad.

Thursday, February 16, 2012

Valentine's Day Water Marble

Better late than never!! I'm usually behind on my posting, so naturally this was going to be a couple days late. I did this water marble ON Valentine's Day. I planned to do it the day before, but I had work and class and I'm pretty sure something else. Oh!! (I'm typing out my thoughts lol). That's right. I then ended up going out to lunch with my friends and their INSANELY adorable son who is 8 weeks old. So anyway, long story short, I did the water marble on Valentine's Day and haven't gotten around to posting it until now! So here it is!!


Valentine's Day Water Marble

Valentine's Day Water Marble

Valentine's Day Water Marble

Valentine's Day Water Marble

Valentine's Day Water Marble


My favorite nails

Valentine's Day Water Marble Valentine's Day Water Marble Valentine's Day Water Marble


2 coats China Glaze White on White*
Water Marble colors are
Orly Fancy Fuchsia
China Glaze White on White
Orly Happily Ever After

*So about my base coat. While I started with 2 coats of White on White, there's also a failed mani attempt. You see, I was trying to do a bunch of small, red and pink hearts on each nail over white. Some hearts looked perfect, others not so much. I didn't like it enough to post about it, so I didn't and won't. So I had that on my nails when I went to water marble. I figured why bother repainting my nails white? They're already almost completely white. Well, you can definitely see hearts, or some random red/pink dark spot underneath the water marble in some areas. If you were curious, that's what it was. Don't judge. Lol

Sunday, February 12, 2012

Valentine's Day Glitter Tips

So obviously this isn't specifically a "Valentine's Day only" mani, more of a "Valentine's Day mani IDEA". I know not everyone has stamping plates or other things that I or others may use for a V-day mani. Or maybe they consider it tacky or just want something simple. So all you need for this is a base polish, a glitter polish, and a top coat*!


Revlon Lilac Pastelle with Silver Glitter Tips

Revlon Lilac Pastelle with Silver Glitter Tips

Revlon Lilac Pastelle with Silver Glitter Tips

Revlon Lilac Pastelle with Silver Glitter Tips

Revlon Lilac Pastelle with Silver Glitter Tips


3 coats Revlon Lilac Pastelle
1 coat Poshe
Silver glitter is Ardene Diamonds
1 more coat Poshe*

*I find a top coat necessary because of my technique. If you don't use a top coat, you may be able to see streaks of the clear base of the glitter polish.

I did these just like my China Glaze VIII with Glitter Tips post. Here's how I did it:

1. Paint on your base polish as you normally would.

2. Add a quick dry top coat (which I recommend), or wait until it's dry.

3. Paint the glitter polish just on the tip of your nail.

4. Wipe the brush on the sides of the bottle and gently, use the glitter polish brush to use light, irregular strokes and brush some polish from the tip towards the cuticle.
I don't go all the way to my cuticle. I just sort of gauge how far up I want it.

5. Go over the tip again to make sure the glitter is heavier there to help with the gradient effect.

6. Use a top coat and you're done!!

Tuesday, February 7, 2012

Pretty Valentine's Day Stamping

So I had been wearing Rica and decided I loved it SO much I wasn't ready to take it off. But I hate wearing the same color on its own for a long time. Long time is relevant. For me, a long time is 2 days. Then it hit me! Duh! Valentine's Day!! And stamping is so quick and easy, so out came my plates, and here is the end result...


Rica Valetine's Day Nails

Rica Valetine's Day Nails

Rica Valetine's Day Nails

Rica Valetine's Day Nails

I've decided to start doing farther away hand photos of my nails like Nailtastic because I think it gives a much more realistic view of how the polish looks. More on that later, but here ya go!

Rica Valetine's Day Nails


2 coats Zoya Rica
1 coat Poshe
Stamping with Konad White and Bundle Monster plates BM17 and BM-209
1 coat Poshe (though I think I took the close up photos before putting this one)

I LOVE the way this came out. The foily-ness of Rica with the basic white. The lacy, delicate design and simple accent nails. I wore this mani for... THREE DAYS!! I had Rica on for two days on its own, then this for three days! That totals FIVE DAYS!! I think this might be a record, legit.

Speaking of which, I usually never discuss wear of polish because I never wear it long enough to comment. But as I type this, it's the fifth day and I have no signs of wear or chipping at all. I know people tend to have wear problems with Zoya. Honestly, I never wore a Zoya polish long enough to determine if I had that problem, too. But apparently I don't. Five days going strong! So if you're curious of my base and top coat combo, I used Nail Tek Intensive Therapy II as my base coat and Poshe as my top. Obviously I have two coats Poshe because of the stamping. Sometimes I have problems with a second coat of Poshe causing my polish to peel up pretty quickly. I don't know if this worked out so well because it's not a creme polish, or because it's just a really harmonious combination.
Also, I actually wore this for SEVEN days because I had no time to change or take off my polish, so I painted another color on top of Rica with another coat of polish. No chips with that, either!

Monday, February 6, 2012

Super Bowl NEW ENGLAND PATRIOTS!!

Yesterday was the Super Bowl. I live in Connecticut. If you weren't aware, "Connecticutians" have an INTENSE rivalry when it comes to sports. We are right between Boston and New York. So you can imagine how that works. Red Sox vs. Yankees. Patriots vs. Giants vs. Jets. And people are VERY passionate about their teams. So when the Patriots and Giants were both headed to the Super Bowl, it was gonna be pretty big.

Obviously the game has happened, the Giants won. I, personally, am not a huge sports fan (except hockey!) and don't really follow football. But I was cheering for the Patriots because I was raised a Patriots fan, my boyfriend is a Patriots fan, and eh, I had to choose one!

So of course my nails had to match accordingly. I actually finished these this morning, after the Pats lost :( I tried to finish them up yesterday, but I was so busy getting food ready for the game that I completely ran out of time. I wanted to post these yesterday, but obviously since they weren't done, I couldn't. So here they are!!

Camera Photos

New England Patiots Super Bowl Nails

New England Patiots Super Bowl Nails

New England Patiots Super Bowl Nails

New England Patiots Super Bowl Nails


iPhone Photos
*because it looks much better NOT in macro. This is how it looks in real life. Looks much cleaner.

New England Patiots Super Bowl Nails

New England Patiots Super Bowl Nails


White is China Glaze White on White
Blue is Sally Hansen Thinking of Blue
Red is Orly Poison Apple
Grey was Orly Mirror Mirror, then I went over it with OPI Skull & Glossbones because Mirror Mirror was too dark.

Wednesday, February 1, 2012

Gwen Stefani Luxurious Video Nails

So I totally love Gwen Stefani. If I had the money to maintain my hair the way she does, I'd be THAT blonde. I just love her all around. She's adorable. I loved her in No Doubt, love her on her own. Just love her. So if you watch her Luxurious music video, you'll see at the beginning she is getting acrylics and her nails painted. They do a whole little thing all about it with a shot of the polish dripping into the bottle, zooming in on her nails getting painted, etc. It's pretty cute. So I decided I wanted to do my nails just like hers... minus the acrylics of course! So I'm assuming the polish is Essie just by watching shots of it in the video. The video was released in 2005, so it had to be a polish that was out at that time. I concluded there's a good chance it's Wicked. So that's what I went with!


WickedLuxurious1

WickedLuxurious2

WickedLuxurious3


2 coats Essie Wicked
1 coat Poshe
Dotting with dotting tool and China Glaze White on White
Shoulda done a top coat but didn't :(

So here are some shots from the video:


Gwen Stefani Luxurious

Gwen Stefani Luxurious

Gwen Stefani Luxurious

Gwen Stefani Luxurious

Gwen Stefani Luxurious


So, I actually LOVE her accent nails. She has a 5 dots in a circle, and two circles on each nail. The nails she has done are both of her pinkies and her left ring finger. All nails have two circles, but I couldn't fit two circles on my pinkies, so they had just one. If I had super long nails or acrylics, I totally would have done them EXACTLY like hers.
I loved that this video had a good chunk of time focusing on her nails. I would also love to do more music video inspired nails, so if you have a music video that you LOVE the persons nails in, comment and I'll try to figure out a way to match it!

And you know you wanna watch the video...